Skiers can only stay safe on the slopes if they have the right equipment. And nothing between the ski and the boot is more important than the ski binding. It is the connection that enables power transfer and control, and provides direct feedback on the snow conditions. It is therefore vital that the ski binding is correctly adjusted. SnowTrex explains what winter sports enthusiasts need to look out for and how to find the optimal setup.
Here’s how: Calculating the Z-value for your ski bindings
The Z-value, also known as the DIN value, describes the release value of the ski binding. It indicates how much force must be applied to the binding for it to release the ski boot in the event of a fall. Setting this value correctly is one of the most important steps in adjusting your ski bindings, as it determines whether the binding releases at the right moment to prevent unnecessary injuries, without opening unintentionally whilst skiing.
Using a DIN table (ISO 11088), which is based on extensive accident statistics and guarantees a globally standardised approach through its standardisation, professionals also determine the appropriate Z-value for each individual skier. Factors such as body weight, height, age, skiing ability and the sole length of the ski boot are taken into account. The intersection of weight and sole length ultimately determines a base release value, which must then be adjusted according to ability and age. In addition to printed tables, the Z-value can also be determined easily and simply using online calculators.
| The skier's weight (kg) | The skier's height (cm) | Sole length under 250mm | Sole length 251-270mm | Sole length 271-290mm | Sole length 291-310mm | Sole length 311-330mm | Sole length over331mm |
|---|---|---|---|---|---|---|---|
| 10-13 | 0,75 | 0,75 | |||||
| 14-17 | 1,0 | 1,0 | 0,75 | ||||
| 18-21 | 1,5 | 1,25 | 1,0 | ||||
| 22-25 | 1,75 | 1,55 | 1,50 | 1,25 | |||
| 26-30 | 2,25 | 2,0 | 1,75 | 1,5 | 1,5 | ||
| 31-35 | 2,75 | 2,5 | 2,25 | 2,0 | 1,75 | 1,75 | |
| 36-41 | 3,5 | 3,0 | 2,75 | 2,5 | 2,25 | 2,0 | |
| 42-48 | under 148 | 3,5 | 3,0 | 3,0 | 2,75 | 2,5 | |
| 49-57 | 149-157 | 4,5 | 4,0 | 3,5 | 3,5 | 3,0 | |
| 58-66 | 158-166 | 5,5 | 5,0 | 4,5 | 4,0 | 3,5 | |
| 67-78 | 167-178 | 6,5 | 6 | 5,5 | 5,0 | 4,5 | |
| 79-94 | 179-194 | 7,5 | 7,0 | 6,5 | 6,0 | 5,5 | |
| over 95 | over 195 | 8,5 | 8,0 | 7,0 | 6,5 | ||
| 10,0 | 9,5 | 8,5 | 8,0 | ||||
| 11,5 | 11,0 | 10,0 | 9,5 |
Calculation examples for a suitable Z-value
- According to the table, a female skier weighing 60 kg, measuring 160 cm in height and with a sole length of 280 mm has a base Z-value of approximately 4.0. If she is a beginner, this value remains unchanged. As an advanced skier, the value would increase by one level to around 5.0, and for a very athletic skiing style, it would even increase by a further level to 6.0.
- A sporty skier weighing 85 kg, standing 180 cm tall and with a sole length of 320 mm initially has a base Z-value of around 6.5, which, however, needs to be adjusted due to his higher level of skiing ability. As an experienced skier, his value is around 7.5, and at ‘racing level’ it is increased by two levels to 8.5.
Z-values for children, seniors and sporty riders
For safety reasons, it is crucial for children under 10 and adults aged 50 and over to use a lower Z-value than sporty skiers. In the DIN table, you move up one row to set the binding ‘softer’. This reduces the release force, providing better protection for bones and joints. For sporty skiers, the opposite is true.
So, anyone who skis fast and with a strong technique generally needs a higher Z-value. This ensures that the binding does not open unintentionally, even under heavy load. In this case, the setting in the table should be one or two rows lower. However, this adjustment should be made with a sense of proportion, as a setting that is too ‘stiff’ can be risky. Recreational skiers should therefore not model themselves on racers, but choose a safe middle ground.
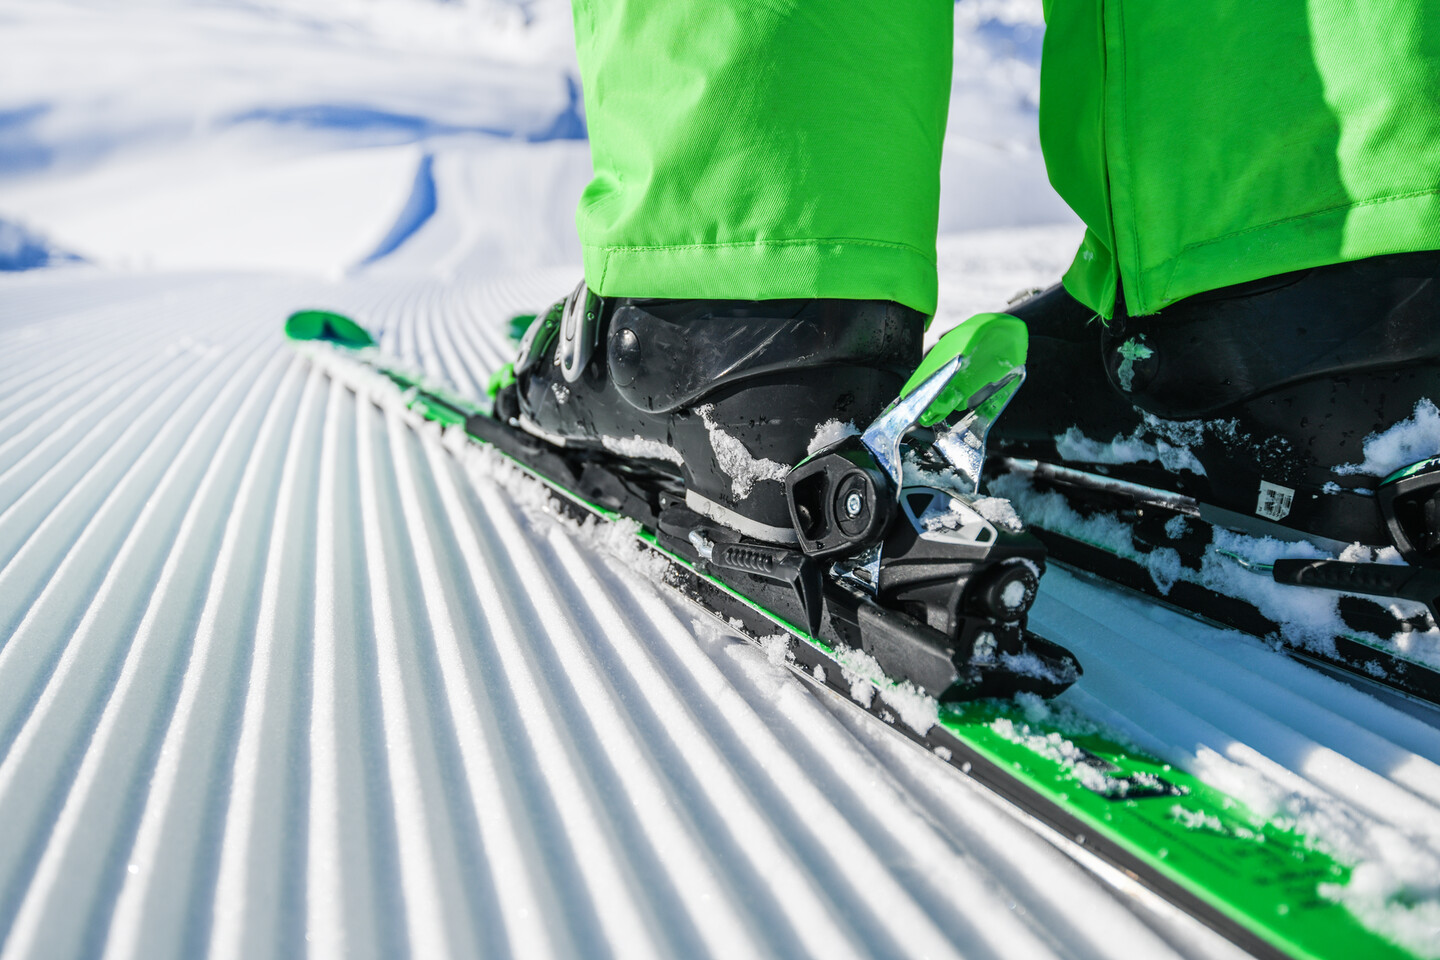
Checking and adjusting the contact pressure of the ski binding
The preload determines how firmly the binding’s heel mechanism presses the ski boot against the front plate. When set correctly, it ensures a secure hold on the piste and reliable release in the event of a fall. Correct preload on the ski binding is essential for safety on the piste. If the pressure is too high, the binding may not release in a fall, which can lead to painful knee or leg injuries. If the pressure is too low, however, the boot sits too loosely, meaning the ski binding could open even with minor impacts and at low speeds, for example on a flat run. In short: only with the correct pressure will the boot remain secure and the ski binding release reliably in an emergency.
To help set the correct pressure, modern ski bindings feature viewing windows, markings or indicators on the heel section, allowing you to check the settings. If the fit isn’t right here, the pressure can usually also be adjusted via a screw or a ratchet mechanism on the binding plate. You can then easily check whether the settings are correct using a business card. If it slides too easily between the heel and the binding stop, the pressure is too low. If, on the other hand, nothing fits in between, it is too high.
Step-by-step guide to binding adjustment
Whether skiers do it themselves or have an expert at the sports shop do it: adjusting a ski binding requires good preparation. First and foremost, you naturally need the ski boot that will actually be used for skiing, as the shape of the sole can vary. It is equally important that the work area is level, stable, well-lit and clean to prevent the dry, cleaned ski from slipping during adjustment. For the next steps, you should have a suitable screwdriver (Phillips, flat, Torx or Allen) as well as a ruler or tape measure to hand.

Please also note that by using our services and integrating the YouTube API Services, the YouTube Terms of Service and the YouTube API Services Terms apply and your use of our website is deemed to be acceptance of these terms.
Correctly adjust the Z-value at the front and rear
The first step in setting up the bindings is to adjust the correct Z-value. Both the front jaw and the heel mechanism feature a scale for adjusting the release force, which can be varied using screws or adjustment mechanisms. Using a screwdriver, the Z-value can then be carefully adjusted on both binding parts simultaneously. Each turn should be made carefully, paying attention to the movement of the scale markings. Ultimately, it is crucial that the setting is the same at the front and rear so that the binding releases synchronously in the event of a fall. And if you want to be absolutely sure, check the set values at the end.
Check and fine-tune the contact pressure
To adjust the contact pressure, the ski boot must click audibly and noticeably into the binding at both the front and rear. You must then check on the heel release tester whether the indicator is within the target range. If this is not the case, fine-tuning is required. Depending on the binding model, this is done via the Z-value screw or by adjusting the sole length. To do this, move the heel mechanism forwards or backwards until the contact pressure is within the optimal range. After each adjustment, you should test again to ensure the boot is secure. But under no circumstances should it be too tight, to ensure proper function and safety.
Care and inspection of ski bindings
Ski bindings must be regularly maintained and checked. This is because they are subjected to heavy mechanical stress on the slopes and are exposed to environmental factors such as cold or wet conditions. If skiers ensure that their bindings – whether on hired or purchased skis – are well maintained, they will function correctly and release reliably. Therefore, ski bindings should be thoroughly cleaned before the season begins. It is particularly important to remove dirt, dust and old wax residue from the joints and springs to ensure they remain flexible. A small amount of lubricant helps to keep the mechanism in good working order.
In addition to the pre-season check, it is also important for skiers to check their bindings during the season, for example after a fall. This is because the force exerted can cause the screws or soles to shift slightly. In such cases, the same adjustment procedure applies as after a skier has lost weight, if they are skiing better, have bought new ski boots, or simply because several years have passed since the last check. As a rule of thumb, experts say that winter sports enthusiasts should have their ski bindings professionally checked every one to two years or after 30 days of skiing. This is because if ski bindings are regularly cleaned, checked and adjusted, they can be used more safely and last longer.
Service life, maintenance cycles and replacement of bindings
Although high-quality ski bindings are very robustly constructed, they simply need to be replaced after eight to ten years. Whether they actually last that long depends on how they are used and maintained. Over time, the springs become stiff, the plastic parts brittle and the metal rusts, which can cause the settings of the ski bindings to shift. Warning signs include cracks, stiff mechanisms or worn screws. How often the bindings need to be checked depends on how often the skis are used on the slopes. Frequent skiers should therefore have their ski bindings checked every year, whereas occasional skiers need only do so every two years.
The safest approach is to have your own skis or hire equipment cleaned, inspected and checked by professionals to extend their lifespan. Replacing the bindings is essential if the mechanism is broken, they are generally too old, or spare parts are no longer available. However, if ski bindings are regularly maintained, checked and replaced in good time, they will function safely and reliably.
Adjust them yourself or take them to a specialist retailer?
To ensure skiers can enjoy the slopes safely, their skis and bindings must be correctly adjusted. To guarantee this, you should either do it yourself or take your ski equipment to a specialist retailer. The latter have the better and more suitable tools, as well as the necessary experience. This allows them to check not only the Z-value and contact pressure but also the tensile and torsional forces of the binding. This is important because manufacturing tolerances, wear on the ski boot sole or a warped ski can affect these values.
To determine the correct settings, specialists use guidelines based on the DIN standard “ISO 11088”, taking into account the skier’s weight, height, age, ability, sole length and, where applicable, the diameter of the tibial tuberosity. This means that even for special cases, such as people with very large feet or different leg structures, the appropriate binding settings can be found. During a professional binding check, damaged parts can also be identified and snow brakes inspected. To do this, they clean and lubricate moving parts, and after the adjustment, a report is provided on request as proof. This can ultimately be important for insurance and liability purposes, for example in the event of a fall.
This is what the binding adjustment costs at a specialist retailer
The cost of adjusting ski bindings is generally not high. It usually ranges between €10 and €30 per pair of skis, but often only between €15 and €20, including a brief functional check. Some sports shops even offer the latter free of charge or at a reduced rate. For example, when buying new skis or as part of a full service, where the skis are also waxed and the edges sharpened. Ultimately, the equation here is simple: the investment in a ski service is low, whilst safety on the slopes remains high.

Standards and safety recommendations for ski bindings
Official standards are important for the safety and quality of ski equipment. The “ISO 11088” standard governs the fitting, adjustment and inspection of ski bindings. This standard also regulates correct attachment to the ski, the setting of the release value (Z-value) and functional testing. This ensures that the same safety rules are adhered to worldwide. Meanwhile, the DIN standard “ISO 8061” specifies how to select the correct Z-value, taking into account the skier’s weight, height and age. For skiers, this means that anyone adjusting their own bindings can rely on the official tables and apply the same standard as professionals. However, the standard does not in any way replace the need for a check where values are read, adjusted and re-measured to ensure optimum safety on the slopes.
Tips from the German Ski Association (DSV) and the Foundation for Safety in Skiing (SIS)
Regular checks: The DSV and SIS strongly advise having ski bindings checked by qualified personnel at least once a season. Bindings should be checked just before the first day of skiing and readjusted if necessary.
Individual adjustment: Every ski binding must be individually adjusted to the specific skier! Using standard settings or even copying a friend’s binding settings – even if height and weight are similar – can be dangerous. This is because even a different ski boot sole can lead to different release behaviour.
Professional adjustment: The DSV’s safety experts strongly recommend that a trained professional reviews all relevant settings of the ski bindings. Ideally, ski bindings should be adjusted at a specialist sports shop, particularly those for children, older skiers, or when winter sports enthusiasts are unsure whether the settings are truly correct. This allows the specialist staff to use a binding tester for fine-tuning, amongst other things.
Safety before comfort: The SIS also points out that even when correctly adjusted, a ski binding can sometimes release unintentionally, for example on very hard terrain, and conversely may not release during some falls. To prevent injuries, experts say it is crucial that, when in doubt, a slightly softer setting with a lower Z-value is chosen to prevent injuries. The rule here is: a lost ski is annoying but manageable; an injured knee is less so.
FAQ on adjusting ski bindings
How do skiers find the right Z-value for their ski bindings?
The Z-value is determined based on the skier’s body weight, height, age, skiing ability and the length of the sole of their ski boot. This is calculated using a DIN table (in accordance with ISO 11088), which cross-references weight and boot size. A base value is then obtained, which must be adjusted depending on the skier’s profile. Sporty skiers should choose a slightly higher value, whilst children and adults over 50 should choose a slightly lower one. Important: The value determined in this way is merely a guideline. For maximum safety on the slopes, the final setting should be checked by a specialist.
How can winter sports enthusiasts tell if their ski bindings are set correctly?
One sign is that they do not release unintentionally and open immediately in the event of a fall. To ensure this, you must check before your first run that the Z-value on the front and rear plates matches your personal setting. The contact pressure must also be correct, meaning that the indicator on the binding must be in the green zone and the boot must fit snugly but not be too tight. And if all these adjustments are carried out by a specialist retailer, winter sports enthusiasts can also receive a test report on request.
Can winter sports enthusiasts adjust their ski bindings themselves, or should they ask a specialist retailer to do it?
In principle, ski bindings can be adjusted yourself with a bit of know-how. Many experienced skiers make minor adjustments themselves. To do so, they should have the relevant tables and suitable tools to hand and work very carefully. The advantage of a specialist retailer is that they have the appropriate testing equipment and a wealth of experience. This enables them to set the Z-value precisely, adjust the contact pressure and test the binding using a simulation. It is particularly advisable to consult a professional when using new skis and boots, or if skiers are unsure.
How much does it cost to have your ski bindings adjusted at a sports shop?
The cost of a binding adjustment is reasonable. In many sports shops, winter sports enthusiasts pay around 10 to 20 euros per pair of skis for the adjustment, including a test. Some retailers even offer this service free of charge. For example, if the skis were purchased there or a full ski service has been carried out. However, even if the cost is between 20 and 30 euros for fitting a new binding, including adjustment, it is money well spent, as it increases safety on the slopes thanks to precisely adjusted equipment.
How often should ski bindings be checked or readjusted?
At least once a year, ideally before the start of the season. Even if a skier’s weight or ability remains unchanged, the springs in the bindings can wear out over time, or settings can become misaligned due to vibrations. In addition, ski bindings should always be checked following a serious fall, if there have been noticeable changes in weight, or if new ski boots have been purchased. Regular binding checks ensure that the equipment is always optimally adjusted.

